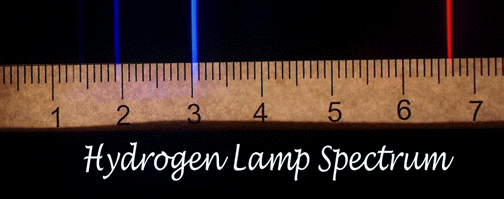
An inexpensive diffraction grating makes it possible for anyone to enjoy and utilize spectroscopy.
Typically a spectroscope is needed to make the experience complete. Inexpensive spectroscopes are available. But, with only a diffraction grating you can design and create the scope of your choice.
EDMUND SCIENTFIC is a good source for the basic necessity, a diffraction grating. Edmund's catalog also contains an interesting array of additional spectroscopy products.
My initial exposure to spectroscopy took place in my chemistry class at Arkansas State University-Mountain Home. The lab manual, "Chemtrek: small scale experiments for general chemistry" by Dr. Stephen Thompson offered my first peak into this fascinating study of visible spectra. An interesting concept taught and utilized in the course was the construction of your own scientific instruments wherever possible. This helps the student to not only learn how to use scientific instruments, but to understand their construction, enable them to make their own modifications, and perform their own corrective maintenance when necessary.
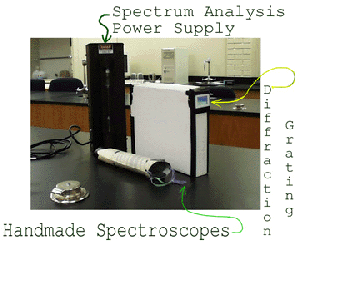
The white box with the diffraction grating shown in the Handmade Spectroscopes picture is the typical spectroscope constructed and utilized in the classroom. The Chemtrek manual asked several thought provoking questions under "Exploring Spectroscope Specifications". e.g. "What is the relationship between the distance of the source from the spectroscope and the characteristics of the spectrum?" ,"Predict what differences in the spectrum you would see if the spectroscope were made out of a giant pizza box." These questions inspired me to experiment when I got home. One of the things I had to experiment with was a 46cm by 6cm document mailing tube. This tube was about twice as long as the box used in class. All spectra observed through the tube had sharper clarity. The longer distance from slit to diffraction grating also caused each spectrum to spread out more. I took this tubular spectroscope to class to show to my instructor. His interest was pale compared to mine. Could I calibrate it, he wanted to know.
Calibrating a spectrum produced with this tubular spectroscope proposed a problem. Edmund Scientific offers several tubular spectroscopes, but none of them provide a means for calibration. Spectra created with a diffraction grating are produced at an angle from the line of sight axis from the eye to the source. To spot the spectrum, the viewer has to look off to the side of the slit location. A square or triangular shaped scope make it possible to place a scale in the vicinity of the spectrum so it can be measured. In a tubular scope, the spectrum's perceived position is outside of the inner confines of the tube. This makes matching a scale to to the spectrum position difficult if not impossible.
In class we had previously viewed a spectrum produced by a
neon lamp. ![]() While thinking about how I
could measure a spectrum in the tubular scope, I thought of the
neon spectrum. If an unknown spectrum could be simultaneously
compared with a neon spectrum then, would it be possible to
identify the unknown lines relative to the multitude of known
neon lines? I mentioned this concept to my instructor. I told
him that if I had access to a small neon bulb, I could
partition the tube and mount the neon bulb where only its
spectrum would be visible in the lower half. Then any other
source could be compared simultaneously with the neon bulb.
This seemed to tweak my instructor's interest some. He showed
me a small neon bulb, and told me where I could acquire one.
That night I created a "real time dual spectrum"
spectroscope. My instructor liked this. Soon afterward he
invited me to take part in this research fellowship project
While thinking about how I
could measure a spectrum in the tubular scope, I thought of the
neon spectrum. If an unknown spectrum could be simultaneously
compared with a neon spectrum then, would it be possible to
identify the unknown lines relative to the multitude of known
neon lines? I mentioned this concept to my instructor. I told
him that if I had access to a small neon bulb, I could
partition the tube and mount the neon bulb where only its
spectrum would be visible in the lower half. Then any other
source could be compared simultaneously with the neon bulb.
This seemed to tweak my instructor's interest some. He showed
me a small neon bulb, and told me where I could acquire one.
That night I created a "real time dual spectrum"
spectroscope. My instructor liked this. Soon afterward he
invited me to take part in this research fellowship project
Can Digital Cameras and Color Scanners be used to do Spectroscopy?
The major question this project seeks to answer is whether or not color scanners and digital cameras can be used to do spectroscopy. In the lab, painstaking drawings or written descriptions have to be made to keep a record of what has been observed. Good records allow subsequent identification of unknowns. Identifying unknowns is an important aspect of chemistry. Incorporating the ever more ubiquitous new technology that surrounds us can relieve some of the tedium involved with good note keeping. A student, scientist, or researcher freed from the tedium of cumbersome note keeping can concentrate on more weightier matters.
An important feature of a spectroscope is the narrow slit that allows a light source to enter the spectroscope. The image of the slit is what is actually seen across the spectrum. If a "T" or an "L" is used instead of an "I", a three dimensional effect is created as the shape of the slit is spread across the the spectrum. The slit is the feature that produces the sharply defined lines found on a spectrum. Without the slit the spectrum is poorly defined. This fact led to the initial erroneous conclusion that any attempts to photograph a spectrum should be attempted through a spectroscope.
Early attempts at taking a picture through a spectroscope
proved promising. However, several
inherent problems were encountered. The early spectrum shown here
is slightly over exposed.
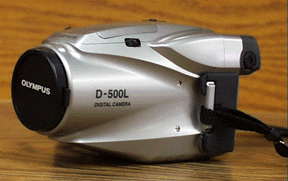
This camera is not the cheapest available, neither is it the most expensive. It is a point and shoot camera with many nice features. The techniques developed to take pictures of spectra can be used with cheaper cameras. Some of the techniques are not necessary with the more expensive cameras. The D-500L has three resolution levels, a pop-up flash, an auto exposure setting, and is automatically focused. The camera also has a built in zoom and is a single lens reflex camera with an LCD display.
The auto exposure and auto focus features are normally nice for quick and easy shots. However, in attempting to shoot spectra through a spectroscope both of these features proved to be a hindrance. The camera would not easily focus on a spectrum. It often took several attempts to get the focus to lock in. Once the focus did lock in, the dark environment inside the spectroscope caused the camera to have an exposure setting that produced an overexposed spectrum. Also, the spectrum is not viewed square with the diffraction grating. The camera has to be held at an angle to the grating. At this angle it is relatively easy for the eye to acquire the spectrum, but difficult for the camera. These factors made the task difficult. This difficulty required an easier way to be found, or the attempt to take convenient pictures of spectra would have to be abandoned.
Camera mountable spectroscope
The camera mountable spectroscope made intuitive sense. Like a special lens it attaches to the camera so a photographer can aim and shoot. The camera end of the tube was cut at an angle to facilitate proper spectrum placement. The diffraction grating was also mounted at an angle to accommodate camera fit and hopefully spectrum acquisition.
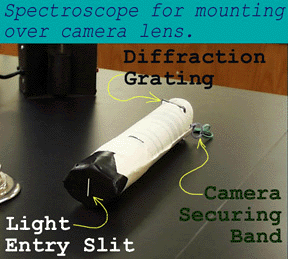
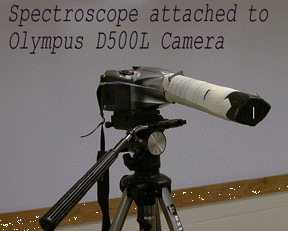
A rubber band was used to secure the spectroscope to the camera. In step with small scale chemistry concepts, this spectroscope is easily and cheaply made. However, it also proved to be unsatisfactory as a means to capture good pictures of spectra.
The Journey Continues- -
A key component of a spectroscope is the narrow slit. This slit allows light to enter into the spectroscope's darkened interior and strike the diffraction grating at the viewing end. The lines produced on the spectrum are actually an image of the slit. If the slit is wide, the spectral lines are wide. A finer, narrower slit produces a finer, narrower spectral line. It is possible to view a spectrum with only a diffraction grating. However,without the slit, the spectrum is quite often poorly defined and takes the shape of the source.
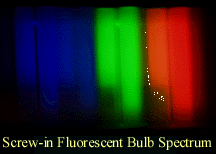
This is a quad cylinder screw in fluorescent bulb spectrum taken through a diffraction grating without the benefit of a slit. The shape of the bulb is easily recognized.
This is a globular screw-in fluorescent bulb.
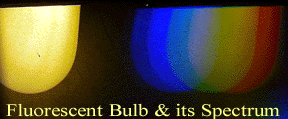
Notice that its spectrum was taken simultaneously with the bulb, and the spectrum reveals the shape of the bulb. These two pictures demonstrate the necessity of the slit to produce a spectrum with well defined lines.
Poster board or a similar product can be used to mask the light with a slit.
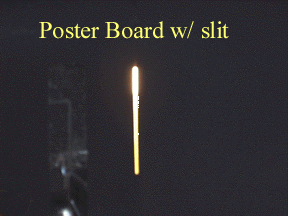
Before looking at the spectrum produced with this masked source, notice the greater intensity of light at the top of the slit as opposed to the lower part of the slit.
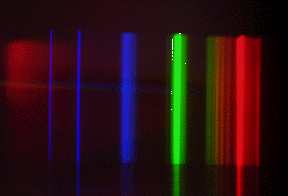
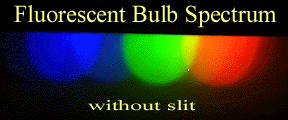
These two pictures are spectra of the same source. One taken using the slit, and one taken without the slit. The thin stems on the lower part of the spectrum taken using the slit coincide with the lower intensity portion of the lower slit. Also, notice the spectrum without the slit is similar, yet different to the above fluorescent bulb and its spectrum picture. The distance between the diffraction grating and the light source make the difference. In the earlier picture, both the light bulb and its spectrum were captured in the same shot. However, due to the close proximity of the diffraction grating to the source, the spectrum is compressed. In the latter picture the spectrum is spread out more, and the source is not captured in the same shot.
The quality of this spectrum taken with only a diffraction grating and the poster board/slit mask is superior to any previously spectra pictures attempted through a typical spectroscope. However, this spectrum shot still lacks a calibration scale.
Calibration Scale
Integrating a calibration scale into the spectra pictures was a final problem that needed to be overcome. I considered ways of matching a spectrum with a scale inside the computer. This is quite possible, however the best way seemed to be able to simultaneously take a picture of a scale the same time the spectrum picture is shot. A scale inside a spectroscope is typically quite small. It was difficult enough trying to get a good spectrum picture through a spectroscope. To attempt to capture the spectroscope's scale simultaneously was almost too much to bear.
The spectroscope scale would most likely require a macro camera setting while the spectrum did not. The spectroscope scale was quite difficult to see with the eye in some lighting conditions, so how was a camera going to perceive it? With the abandoning of attempting to capture spectra through the spectroscope with the camera, the spectroscope's scale became a non issue. However, we still needed a scale in our spectra shots.
It is interesting how sometimes the answer lies right in front of you. It only needs to be recognized. I was experimenting with the diffraction grating alone. Light sources resemble themselves in their spectrum. Linear light sources appear linear in the spectrum. Remember the quad-cylinder fluorescent bulb? Sources have to be viewed at an offset angle to see the spectrum. If they are viewed directly, you only see the source. YOU CLEARLY SEE THE SOURCE. It is visible even through the diffraction grating. Woah! If a light source was contained in a box with a window that could back light a scale, and if the desired spectrum source was set off to the side the proper distance, perhaps the scale and the spectrum would overlay. Would this produce the desired effect?
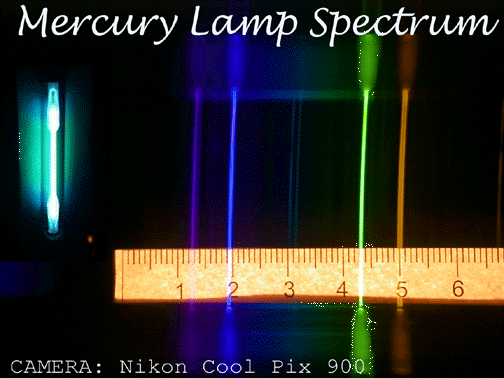
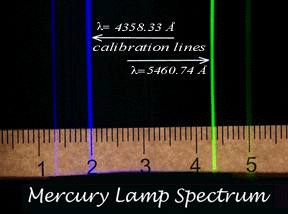
Evidently! So how exactly was it done?
Some comment is necessary on the two pictures of the Mercury Lamp Spectrum. A Nikon 900 Cool Pix camera was used on the picture that includes the Mercury Lamp. The Olympus D- 500L was used on the picture with the calibration lines. Notice the difference in color of the line in the 5 Scale position. The Nikon did a nicer job in reproducing this line. Different digital cameras will render different color duplication results. Articles can be found in photography magazines addressing this issue. It is not the purpose of this project to discuss the issue of color duplication in digital equipment other than to point out that it exists.
The Nikon picture is not clipped like the Olympus picture. It was left unclipped on purpose to demonstrate how the linear bulb produced nice lines except on the ends were the bulb diameter is expanded. No masking slit was necessary with these bulbs and their linear shape. Also, previously was shown a picture of a globular fluorescent bulb and its spectrum. The previous spectrum was compressed due to the close distance necessary to capture the source and the spectrum simultaneously. In the Nikon picture the source and the spectrum are both visible, however the spectrum is not compressed. This is because the source was pasted into the picture rather than taken simultaneously. Primarily I did this to demonstrate again the shape of the spectrum takes the shape of the source when a slit is not used.
Digital cameras and the easy ability to edit the pictures make many things possible. Pictures can be cleaned up, touched up, cut, cropped, pasted, stretched and compressed. Colors can be changed. A vast array of manipulations are possible to make a picture look its best or make a picture look just like you want it too. Regardless of the true facts of the picture the viewer needs to beware that the fact may not be honestly represented. Caveat emptor means to let the buyer beware. When it comes to viewing digital pictures the viewer also needs to beware. If the facts of a picture are important to you, remember what the famous mathematician and philosopher Rene' Descartes said, "never accept anything for true which you do not clearly know to be such." My mentor for this project asked if it was a double exposure when I first showed him a picture of a spectrum and scale that I liked. He had me show him exactly how the picture was accomplished, so that he could know for himself that it was true. With the information this site provides, you too can easily prove and acquire excellent spectra pictures with a calibration scale.
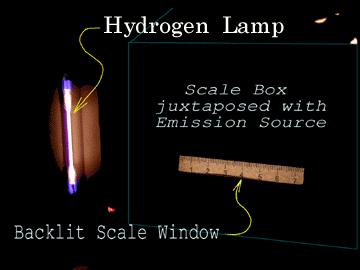
How to Take a Picture of a Specturm with a Measuring Scale"
