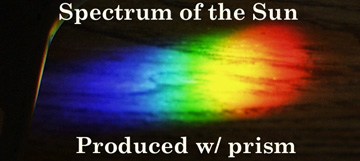
"White light was believed to be a simple entity by every scientist since Aristotle, until Sir Isaac Newton noted the spectrum of colors that was formed when he passed a thin beam of sunlight through a glass prism and was convinced otherwise." i This moment in time likely marked the birth of spectroscopy which is the study of spectra.
"Cognizant of the hydrogen spectrum, Niels Bohr was able to postulate that electrons in an atom have specific energy levels that they are allowed to be in, and when they drop from a higher level to a lower level, they emit a photon equal in energy to the energy difference between the orbital levels." ii Astronomers use spectroscopy to study and classify the stars. Thus spectroscopy from the time of Sir Isaac Newton to the present has enhanced our understanding of the world and universe around us.
A fascinating world of color enchants students as they view the unique spectral signatures of different emission sources for the first time. Viewing spectral phenomena is the fun part of spectroscopy. For the study of observed spectra to be useful some means of recording what has been viewed is necessary. Typically, this recording is accomplished manually. Tedious notes of line color and location must be taken. A colored sketch can be helpful. As digital cameras become more and more ubiquitous and affordable, the ability to simply snap a picture and forgo the chore of manually recording what was viewed would be novel. This freedom would enable students to concentrate more on the interesting aspects of the science at hand rather than having an overall fascinating experience tarnished by the drudgery of tedious note taking.
Taking spectral pictures can be as easy as simply holding a camera to the viewing end of a spectroscope then sighting a source and clicking a picture. The specific type of camera and its features; e.g. auto focus or manual focusing ability, auto exposure or manual exposure ability, zoom capability can all make a difference in the ease and quality of pictures taken. This article will explore and offer a means to overcome the various handicaps a particular camera may pose. Hopefully it will be a catalyst for you to take your very own spectra pictures. There is nothing to loose and everything to gain by achieving a better means of recording spectra data.
Achieving a proper focus and exposure through a spectroscope with an auto focusing and auto exposure camera can be difficult. This difficulty can be frustrating especially when a chemical flame produces a beautiful spectrum that vanishes before the camera can lock in a suitable focus. The capabilities of still shot cameras and video cameras can vary considerably. Many video cameras can handle reduced light levels more dynamically. When attempting to capture a flame spectra a video camera is continuously recording the subject so the peak moments are not missed. The rewards in using a video camera are somewhat offset by the steps required to convert the video image into a digital still. If you have access to a video camera you should try using it to capture spectra pictures. The results can be surprisingly better than what many still cameras can do. My experience acquired during this research project led me to believe that it was not possible to capture a spectroscopes internal scale along wit h the spectrum picture. A video provided by my project mentor made me a believer in the capabilities of the video camera. Many of the newer video cameras now store their data in a digital format and provide software that allows you to process individual frames on a computer.
A scale with which to gage the position of the various spectral lines and compare them against a known source can be an important part of a spectrum's picture. If you find your camera does not have the ability to capture this scale adequately the technique I developed in the course of this research can help you consistently overcome the handicaps of a still camera and produce a good scale reference with every shot. If you use a video camera or you only need a visual image for comparison and a scale is not necessary for calibration you may want to try simply shooting through a spectroscope scope first. If you find the results adequate you can preclude a little extra trouble needed to acquire consistently good spectra shots.
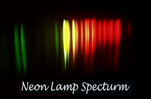
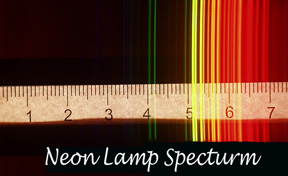
Here is a comparison of a neon spectrum taken directly through a spectroscope and a neon spectrum taken by the technique described below:
The following is the "Robert Technique" for capturing spectral images. By the way, for the erudite few who wish to know, my name uses the French pronunciation of Robert(Row-Bear).

Essential equipment:
Digital Camera
Camera Tripod
Diffraction Grating
Emission Source
Slitting Device
Scale Box Apparatus
A dark room.
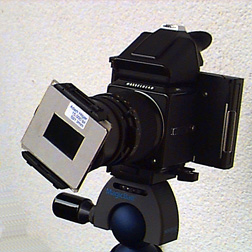
A camera on a tripod is aimed at the scale box apparatus. An emission source is juxtaposed beside the scale box apparatus. A diffraction grating is either held in front of the camera lens or it can be mounted in a filter adapter as shown in the picture taken by Bob Fosbury of the Space Telescope - European Coordinating Facility. To explore more of Bobs fascinating work visit his homepage at http://ecf.hq.eso.org/~rfosbury/ The cameras distance from the scale box apparatus and the emission source distance from the scale box apparatus along with the relative height of each item can all be adjusted until the perfect picture is composed with a nicely defined spectrum overlaying the measuring scale. Once the first picture is composed as desired, the emission source can be continually changed so that pictures of different spectrum from different sources can easily be taken.
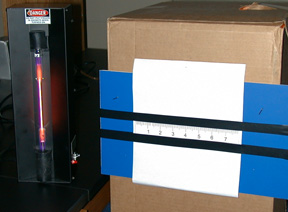
Scale Box Apparatus:
The scale box apparatus provides something for the camera to focus on, and a means to adjust the cameras exposure setting. The scale box apparatus is easily constructed out of a cardboard box. The main requirement for the box size is that it has to be large enough to house a rheostat controlled light that back lights a custom designed scale through a scale port window. The scale port window should be sized to provide back-lighting for the custom scale which is taped over the window. The camera is aimed at the scale which provides a definite object to focus upon. The dim lighting conditions conducive to viewing spectra typically cause a camera with auto exposure settings to overexpose the spectrum. This problem is easily overcome by turning up the brightness of the scale with the rheostat then locking in the focus and the exposure. Once focus and exposure are locked in, the rheostat can be turned down to the optimum level for taking the picture.
The Scale:
A measuring scale is easily designed with modern word processing software and printed on a plain sheet of typing paper. Once created the scale is taped or pinned over the scale port window. A primary goal of the prototype scale I used was to have numbers large enough to photograph. If the distance from the scale to the camera or the zoom setting of the camera is changed between pictures a comparison for calibrating purposes becomes meaningless between shots with different adjustments. Therefore it is imperative that once a setup is established that you like, you either need to be able to duplicate the setup precisely between concurrent setups or take all the pictures you need in one shooting without making any adjustments. Otherwise, the emission source used as a calibration standard needs to be re-shot with each new setup and picture set.
The Tripod and Camera:
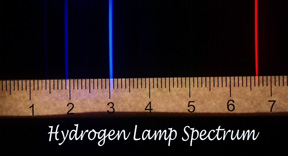
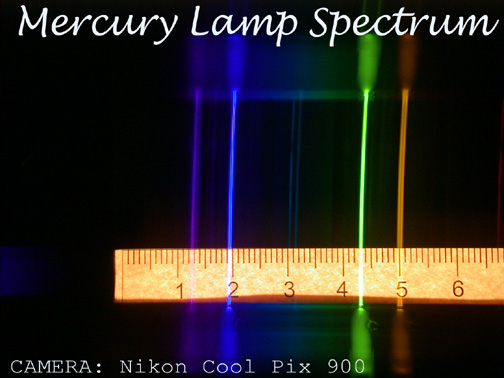
The tripod helps to maintains a constant distance and position from the scale while keeping the camera stable. A camera with a zoom feature helps compose the ideal picture. However it is necessary to use a zoom setting that can be easily reacquired for each shot in order to make the spectrum and scale relationship meaningful for calibration purposes. The primary camera used for the research did not have any means to consistently reestablish intermediate zoom positions, so full zoom was used in each case. Some degradation of the spectral image takes place as it passes through the camera optics. All the emission lines visible with the eye sometimes fail to be completely reproduced by the camera. Note the missing line in the hydrogen spectrum at the beginning of this article. Color reproduction varies among digital cameras so the true color may not always be captured. Otherwise, the camera offers a considerable enhancement over manual notes.
Slitting Device:
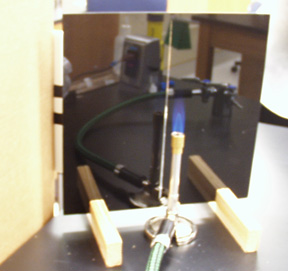
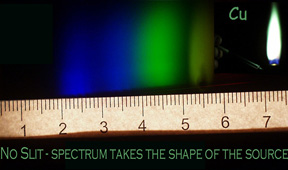
 Depending on the emission source it was found that a slitting device was not always necessary. The spectrum will naturally take the shape of the source. If the source is long and linear, as are the typical spectrum tubes for use with a common spectrum analysis power supply used for studying spectra, a slit is not necessary. However, for flames and other non-linear sources a slit is necessary to form the fine lines a good spectrum sample requires. To create a slitting device that could withstand the heat of a Bunsen burner we used a 30.5 x 30.5 cm square piece of glass. One side was painted with flat black paint. A fine linear scratch was made in the paint down the center to permit the passage of light. The light rays emanating through the slit should be directed toward the camera lens. During the preliminary set up a brighter bulb can initially be used to help aim the light vector that passes through the slit at the camera lens. A simple stand for the pane of glass slitting device was created by making a cross cut with a saw blade that was wide enough to accept the glass into two small blocks of wood.
A Dark Room:
This is not the typical photographic dark room. Any room where outside sources of light can be eliminated will do. The concept is that the whole room becomes the dark interior of a spectroscope. The darkness is necessary to enhance viewing and photographing of the spectra. Care should be taken while moving around the equipment in the dark. A secondary light of low intensity that can conveniently be turned on and off as needed is useful. The secondary lights low intensity helps preserve the eyes dark adaptation which makes working in the dark environment easier.
Emission Source:
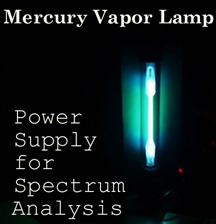
 A spectrum analysis power supply and spectrum tubes typically used to study spectroscopy are easy subjects to photograph.
Their long and narrow shape make the use of a slitting device unnecessary. The spectral lines take the shape of the source object. Flames and non-linear bulbs will require a slitting device. The lower light intensity of flames make the setup more difficult and are somewhat harder to photograph. Once the slit is properly placed to direct the light vector toward the camera suitable results can be obtained. Photographing flames require two people, one to take the pictures and one to feed the fire with the chemical of choice.
A spectrum analysis power supply and spectrum tubes typically used to study spectroscopy are easy subjects to photograph.
Their long and narrow shape make the use of a slitting device unnecessary. The spectral lines take the shape of the source object. Flames and non-linear bulbs will require a slitting device. The lower light intensity of flames make the setup more difficult and are somewhat harder to photograph. Once the slit is properly placed to direct the light vector toward the camera suitable results can be obtained. Photographing flames require two people, one to take the pictures and one to feed the fire with the chemical of choice.
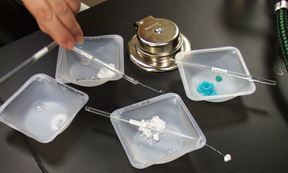
Various Chemical Salts
Conclusions
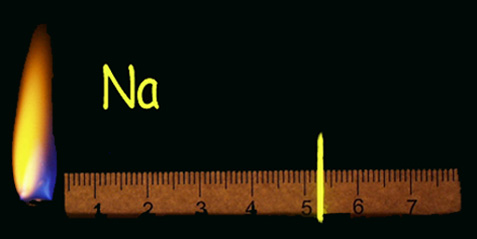
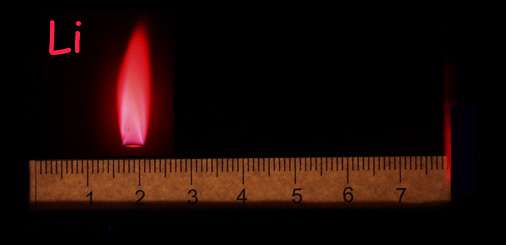
 Here are some sample flame shots taken by utilizing these techniques. Pictures of both the spectrum and the source can be combined in a photo editing program to produce a rich colorful reference with a label indicating the content placed right on the picture.
Hopefully this article will be the catalyst that provides the information to inspire you to take your very own digital spectra pictures. For more information, you can peruse the projects research site on the internet at this address: https://members.tripod.com/ChemCom/ChemCom.html The main page has the following link Spectra Picture Collection ~ What others have done! This page is dedicated to display the masterpieces taken by others. So if you have one or more pictures of spectra that you would like displayed here please e-mail your picture in jpeg or gif format with basic information detailing:
1. the photographer
2. the spectrum source
3. type of camera/equipment used to take the picture
4. basic technique used to take the picture
to: d_robear@hotmail.com
And, I will publish it on the Spectra Picture Collection ~ What others have done! page. Or if you would prefer send a link address to your own site to have your work displayed your way with a link to your page on the Spectra Picture Collection ~ What others have done! page.
In my search for pictures of spectra on the internet I found overwhelmingly that astronomers provided the pictures. These pictures were either in black and white only or were graphical sketches used to display the spectrum data. I also found several sites with a real nice computer created spectrum in color. Nowhere could I find color pictures of real spectra. If anyone knows were sites exist of actual color spectra pictures I would appreciate an e-mail with the link location.
Since Sir Isaac Newton first noted the spectrum of colors that was formed when he passed a thin beam of sunlight through a glass prism science has made fascinating progress on mankinds quest for knowledge . Yet anyone interested in the study of spectra are still shackled by primitive means to record the valuable data they observe. Hopefully this article and your interest in spectroscopy can be the first step in making the primitive means of recording spectra data finally an archaic means.
i Biography of Sir Isaac Newton MathSoft StudyWorks
ii Quantum Theory and Atomic Physics, Discrete Energy States of an Atom: The Bohr Theory MathSoft StudyWorks